Chaturanga is the most dreaded pose. You know that you’re too weak to stay up or move gracefully into it. You’ll move through this pose as quickly as possible in avoidance of frustration and as a way of not belly-flopping on your mat.
Most people feel too weak for chaturanga because it requires strength from muscles that most of us do not use often. It’s not brute strength and force alone needed to perform this movement; it’s core engagement and proper form that will allow you to nail it.
Let’s face it, this pose isn’t easy, and because of this, too many never spend much time with it. But did you know chaturanga is a foundational pose of yoga? You spend more time in this pose than you’re even aware of. So, mastering it is important, which is why learning how to perform the pose properly is important.
But first, let’s uncover why it’s so difficult to do.
Why is Chaturanga So Hard?
There’s no denying the fact that this is probably one of the hardest yoga exercises to perform. Rightfully so, since it is a foundational movement. It trains full-body awareness along with strength and is preparing you for poses that are much harder.
It’s not uncommon for it to take people between 3-10 months to learn this pose.
The inability to perform this pose can certainly make you feel as though you’ll never be able to do it. It’s hard! All of it is – the movement down, the hold, and even getting back up. It takes your concentration off the meditation and puts it onto your inability to do it.
One single offset and you’re grunting with discomfort, falling to the mat because your arms gave way or ready to give up completely because we feel like a failure. But hold on a second. You should know that this pose is even difficult for many athletes. People who have been playing sports for years, and they have the strength to hold themselves up. This is because it’s more than just strength needed.
With that said, it isn’t impossible.
Chaturanga uses so many muscles: pectorals, upper arms, shoulders, core, and your legs even play a major role in it. Let’s not forget to mention that most of the muscles engaged are ones you don’t use often enough, like the smaller muscles in your triceps and front shoulders. As a beginner to yoga or exercising, these wouldn’t be muscles that you’ve used on a daily basis.
When certain muscles are weaker, they then depend on the next muscle group. So, for example, if your arms are weak, it then enables your chest muscles to engage, which throws off your alignment, ultimately making you unstable.
This is why it’s so difficult to do properly. It requires the proper amount of strength and alignment. These two things must work together, and all of your muscles must do their job.
If you’re new to working out, the chances are you’ll struggle with this strength move because of insufficient training and strength deficiencies, but you have options to develop your strength, home in on your form, and alternative exercises.
How Do You Improve the Alignment?
Your alignment is how you do the pose.
Learning how to perform this movement correctly will do two things: (1) it will help make it easier, and (2) it will reduce the risk of injury. These movements aren’t natural, which is why they use muscles that aren’t normally used and are weak.
So, let’s look at how to do chaturanga properly:
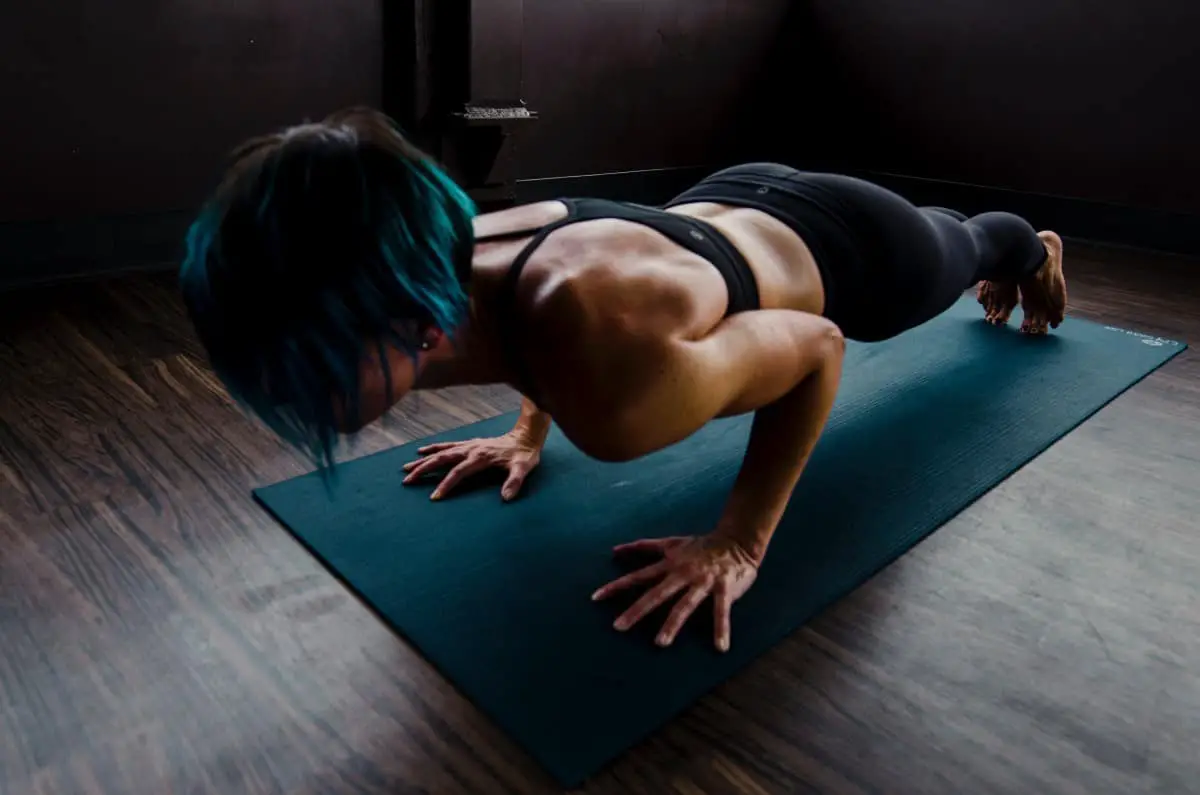
Step 1: In the plank position, your hands should be under your elbows and elbows under your shoulders. You’ll want to be sure you set your hands slightly broader than shoulder-width.
Step 2: Engage your core by pulling your abdominals in. The key to chaturanga is core engagement. You must understand that engaging your core often takes practice.
Tip: Exhaling will help to promote contractions of your core.
Step 3: Then, push your heels back, engage your quads by lifting your thighs up
Tip: If your legs aren’t involved in this movement, you’re causing your upper body to work harder than it needs to.
Step 4: Roll forward on your toes while lowering your body until your arms are on a 90-degree angle.
This all sounds simple enough, right? Well, we know that it’s not from experience.
So, What’s the Problem?
Well, there could be many different reasons. You could be dropping your head, or your hips could be too high or low. Sometimes, a closer look at your alignment will help you to make the necessary adjustments that will make it easier and, more importantly, safer.
Feel free to ask your instructor or a friend or simply set up the camera and record yourself.
If you’re going to record yourself here’s are some questions you’ll want to answer,
- Is your head dropping?
- Are your hips too high?
- Are your shoulders dipping too low?
- Are your shoulders rounding?
- Are your arms at a 90-degree angle?
- Are your elbows splaying out?
- Are your hands too far forward or backward?
Take the time to get the alignment correct. This may take a few tries or many tries, so be patient and focus on the way that you feel in that position. It’s not a natural position; there are lots of moving parts. You’ll need to pay attention to each of them.
Remember how you feel when you are properly aligned. This is going to help you to recognize when you are in the proper form. Eventually, it will become second nature.
But for some who continue to have trouble getting aligned, you should consider an alternative method until your upper body is strong enough – keeping your knees on the floor or using a yoga block under your chest.
Both are going to help reduce the strength needed in your upper body. It’s also the perfect way to begin getting down the proper alignment while building your strength. Remember, proper alignment greatly reduces the risk of injury.
Why Is Proper Form So Important?
It’s obvious, isn’t it? Proper form, alignment, will help you to avoid injury. Have you ever felt a sudden, sharp pain when doing a pose? Most likely, that was due to a pose done out of proper alignment.
But that’s not all, there’s more.
When your body is properly aligned, you will gain the maximum benefits of any type of exercise.
Proper form will help your body to adapt to the exercise for faster improvement of your strength, power, and flexibility. This will allow you to reach your goals faster.
You waste way too much energy when your body is not properly aligned. The weight of your body is moved less efficiently, and your body attempts to compensate for this, therefore, expending unnecessary energy.
You’re breathing is better with proper form. Effectively breathing during this pose is important. Strength and relaxation come with proper breathing.
Discover the Potential Hazards of the Chaturanga Pose
As with any type of exercise, there are some risks of injury, and it’s no different with chaturanga. You’ll often transition into it from various other poses as it’s performed frequently in your asana. The repetitive motion performed incorrectly can put you at risk of an injury. The most common injury is shoulder strain, rotator cuff injuries, neck pain, and low back pain.
Chances are you’re rushing through this challenging pose because you don’t like it, and you’re performing it without any attention to your alignment. This is often why an injury occurs.
You’re not alone; most people want to hurry up through this. Your body starts shaking just thinking about holding yourself up, but the fact is that this pose needs your full attention. So many muscles work together to keep you perfectly aligned and injury-free.
If your head is turned incorrectly, you run the risk of straining muscles in your neck, shoulders, or back. If your elbows are flaring out, you run the risk of shoulder pain, wrist injury, or back strains.
Any type of misalignment leads to a potential injury. This is why it’s so important to listen to your body, improve your strength, use alternative methods until your strength improves, and practice proper alignment. If you have any sudden, sharp pains, you should stop right away.
If you suffer from carpal tunnel syndrome or have had a shoulder, elbow, or wrist injury, you probably shouldn’t practice this pose as it puts a lot of stress on those body parts. This does not mean that you will never be able to do it, but without enough strength or proper alignment, you are at a higher risk of injury.
You should always listen to your body. It will tell you if you’re pushing it too hard. This is often where injury happens. Always know your limits and of course talk with your doctor.
Exercises That Will Help Build Your Strength for Chaturanga
This foundational pose teaches you how to activate your arms and legs while finding your center. But without the upper body strength, you won’t be able to do it. There are a variety of exercises that you can do that will help to tone your arms, shoulders, back, and core. A simple search on google for “pushup progression,” and you’ll find numerous exercises and routines.
Here are some that you can do at home:
Wall Pushups
Chances are you might not be able to do regular pushups, so wall pushups are a great place to start for beginners. To do them, you’ll want to position yourself on the wall the same way you would do chaturanga on the floor.
Planks
These are great to build your abdominal and core strength, which will help with your balance. If your wrists hurt when doing planks, you may want to consider doing forearm planks. It will also strengthen your spine, giving you the strength you’ll need.
How to perform: This is basically a pushup position that you will hold. Your shoulders should be over your wrist, and while on your toes, your feet should be hip-width apart. Be sure that your back is flat. To do this, draw your belly in and up and make sure your hips aren’t high.
Downward Dog
It’s not just for stretching your lower back and the back of your legs. The downward dog helps to strengthen your deep abdominal muscles that support your spine. It’s the perfect place for focus and getting centered.
How to perform: You’ll start on your hands and knees with your wrists under your shoulders and knees under your hips. As you exhale, you’ll lift your knees off the floor and move your pelvis up towards the ceiling. Bring your chest toward your thighs to feel the stretch. Don’t forget to engage your quadriceps.
Upward Dog
As this movement stretches your abdominals, chest, and shoulders, it’s also strengthening your arms and wrists. You may even feel a little soreness in your buttocks and thighs, as this pose will indirectly work those muscles.
How to perform: Lie belly to the floor with the tops of your feet touching the mat. With your arms near your ribs, you’ll inhale and push yourself up fully extending your arms. Push your shoulders together to open your chest and make sure your legs are fully engaged to keep your thighs off the ground.
Dolphin Pose
This pose is very similar to downward dog, except your forearms will be on the floor. When in this pose, you’ll stretch and strengthen your shoulders, arms, back, and legs. You’ll find that your shoulders and back open up, and you’ll feel the stretch in your core and shoulders. But there’s more; it will improve your flexibility of your spine, hamstrings, calves, and arches.
How to perform: Start on the floor with your forearms and knees on the mat, then extend your legs and stay on your toes. You’ll be in a forearm plank position. Now walk your feet towards your hand while lifting your hips high and keeping your legs straight. Press through your hands and forearms to keep your shoulders pushing you back down.
Note: You can bend your knees slightly; just be sure you are keeping your back straight.
Lizard Pose
This pose stretches your hamstrings, hip flexors, and quadriceps, giving you a full range of motion while increasing your strength. It will also open up your chest, shoulder, and neck. As you gain strength, you’ll improve your balance and flexibility.
How to perform: In downward dog position, you’ll bring your left foot forward in between your hands. Then walk your left foot a couple of inches to the left side of the mat and bring your left arm to the inside of your foot. Bring your back knee down to the mat and untuck your back toes so that the top of your foot is on the mat. Do the same thing with your right side.
Note: You can get a deeper stretch if you bring your forearms to the mat.
Chaturanga Dandasana Modifications
We all start at different levels and, some have experienced injuries that make this pose even harder. But the fact that you’re trying to improve your overall strength is amazing. With that being said, pushing ourselves out of our comfort zone is where growth is. So, don’t fly past this pose in class or at home. There are different modifications you can choose from that will allow you the amazing benefits of this pose, while reducing your risk of injury and building up your strength.
So, instead of just breezing right past this extremely beneficial pose, here are three different alternatives. Which modification that you choose will depend on your level of comfort, past injuries, and strength. You may want to test them each out to see which one is the most comfortable to you. Some people are comfortable with their knees down, while this method hurts others’ knees.
Yoga blocks are placed under your chest and will help you to build up your strength, work on your alignment, and build your confidence. It is perfect for those of you that are almost able to do it. Your palms will be on the floor with your elbows bent and chest resting on the block, taking pressure off of your shoulders and lower back. But be sure not to place your entire weight on the block.
Keeping your knees on the ground will help you to improve your stamina and strengthen your core slowly. When you feel stronger enough, you can straighten both legs, or keep just one knee on the ground until you’re confident enough.
Staying on your forearms will keep you balanced while you build your core muscles and build strength. This will be performed with your forearms on the ground and your fingers interlocked.
Coupling these modifications with your strength-building exercises will help you to develop quickly, and before you know it, you’ll be strong enough for a chaturanga pose. Be consistent and patient.
Uncover The 6 Benefits of the Chaturanga Pose
Chaturanga Dandasana is an essential pose for your entire body – from building endurance to properly aligning your body and finding your complete awareness of your body to setting the foundation for more advanced poses.
Benefit #1: Strengthening Your Arms and Wrists
This pose will build strong arms and wrists once you get the right alignment, with practice and time. As you are balancing your body on your arms, you’re not only building muscles in your upper arms, but you’re also building muscles in your forearms.
As you already know, this pose requires strength of your arms, but did you know that you’ll also be improving the flexibility of your elbows and wrists while strengthening both as well?
Benefit #2: Core Stability
Balance is key to every yoga pose, and your core stability is the foundation of this. Better core strength, the better balanced you are. Building your core doesn’t necessarily mean you’ll have a six-pack, although that would be nice. Core-strength will give you power and control over your movements, but it will also help with everyday life. Everything you do on a day to day basis involves your core muscles – from getting out of bed to standing up straight, you use your abdominal muscles.
Benefit #3: Spine Improvements
You’ll find that you’re standing taller, and slouching has become a thing of the past. This is because this pose will bring your spine back to its natural state. The muscles used around the spine begin to expand and lengthen, helping you to stand taller. When we stand taller, our mindset changes, we become filled with confidence.
If you’ve been experiencing back pain, it may even lessen a great deal as you begin to straighten out your spine.
Did you know that slouching can cause potential squishing of our organs? The taller we stand, the better our health in so many ways.
Benefit #4: Strengthens Your Muscles
It’s not just your arms that get stronger! This yoga pose will help to strengthen your shoulders, back, and legs. We tend to forget the vital role these muscles play in this pose because you are indirectly activating them. But nonetheless, you are building them to become strong muscles.
Benefit #5: Overall Healthy Body
You can feel your body physically getting stronger and your flexibility improving, but your mental health is also healing. Suddenly you become completely aware of your body and your breath, and this is when you realize the empowerment of what you have achieved. You’ve uncovered what you have discovered about yourself through mindful connection. This peace, realization, contentment can now be applied to your everyday life.
Benefit #6: Weight Loss
Losing weight is an amazing benefit. You’re building muscles in your arms, wrists, lower and upper back. As we build muscle, we lose weight, and you’re working a major group of muscles at once. Toning the abdomen will help to develop your core and increase your stamina.
As you can see, there are a ton of amazing benefits to this specific pose. The confidence that you gain from this is by far the biggest takeaway, knowing how hard you worked to achieve it.
Alternative Names for The Chaturanga Pose
Depending on your yoga teacher or practitioner, the chaturanga could be called by a different name. The reason for this is because of the differences in their Sanskrit translation. Regardless of what it’s called, it’s still difficult to do.
Here are some other names it will go by,
- Four Limbed Staff Pose
- Chaturanga Dandasana
- Four Limbed Stick Pose
- Caturanga Dandasana
Don’t Be So Hard on Yourself; It’s Hard
We know it’s difficult. We know it’s going to take time to get it, but no good will come from you being hard on yourself. It’s not going to help you to build strength or improve your form. There’s a good chance it will actually prevent you from growing. Take a deep breath and let go of your ego.
Now, here’s the thing, we’ve established that chaturanga is hard. It’s hard for athletes and people who have been doing yoga for years. It requires the use of muscles from your wrists, arms, abs, lower back, and legs. They all must work together. Some of these muscles are smaller muscles that you have not used and are weaker than your bigger ones.
Now, for your core. Your core is your balance, and chances are your ab muscles are weak – maybe you just gave birth, or it’s been years since you’ve exercised.
But it also requires proper alignment, good breathing, and patience.
This is exactly why it’s important to spend time weekly building those muscle groups with the strength-building exercises. It will allow you to progress into the pose without risking injury. Yes, it will take time and work on your part. You cannot expect to build your strength in just a few weeks. It will be a slow progression, but you’ll see and feel the difference.
Final Thoughts
Your alignment is important, so be sure that you are spending an equal amount of time ensuring that your form and alignment are correct. This will prevent potential injury. An injury will most definitely set you back further than you are right now. This isn’t a risk you want to take.
We are all unique, and your progression should never be compared to another person. You can use it as motivation to improve, but that’s all. We each have our share of ailments that can play a factor in our abilities, such as previous injuries or carpal tunnel syndrome. If you have a previous injury to your shoulder or wrist, it’s going to require a bit more time and focus to build the strength back up.
Be patient; you do not want to get hurt. Chaturanga is a connection with strength and energy, but not just physically. Mentally it helps you to find peace and will build your confidence and self-esteem.
Sitasyoga.com is a participant in the Amazon Services LLC Associates Program, an affiliate advertising program designed to provide a means for sites to earn advertising fees by advertising and linking to Amazon.com. We also participate in other affiliate programs which compensate us for referring traffic.