As you have probably learned by now, yoga is a valuable, low impact way to greatly improve flexibility and burn some calories without even realizing it. Although not as famous as the downward dog, the sphinx pose is just as popular in yoga, helping to heal the back while working the front and back cores.
If your intention is just to improve back flexibility, hold the sphinx pose for 3 to 5 minutes. If it is worked into the rest of your routine, 30 seconds is enough. Never exceed your body’s limits, though, to avoid hurting yourself.
Let’s dive a little more into how this pose works and the nuances involved.
How to Do the Sphinx Pose
The gap between, “Am I even doing anything?” and “Ow!” can be very small in yoga. That gap is the perfect blend of:
- Exertion
- Flexibility training
- Relaxation
Afterwards, you will feel great and notice improvements in your movement almost right away. The sphinx pose is certainly one of the most subtle moves in an already rather subtle discipline. But if you position yourself just right, you will certainly feel it working. There are not a lot of options when it comes to training your back, so this is a move you should not skip.
The sphinx pose’s name comes from the sphinx in Egypt. That is what you should picture when you attempt it, particularly with your elbows near (but not exactly) a 90-degree angle. Keeping that in mind, follow these steps to enter and maintain the pose:
- Place a yoga mat on the floor
- Lie down and put yourself in position
- Pull
- Release
1. Place a Yoga Mat on the Floor
You obviously never want to do yoga on any hard surfaces. But even a carpet is not good for it either, as you may risk rug burn and not have any traction. A proper yoga mat is the way to go. If you plan on doing this often, and you should, pick up a descent one online. These come in multiple colors and will last a while; no need to break the bank.
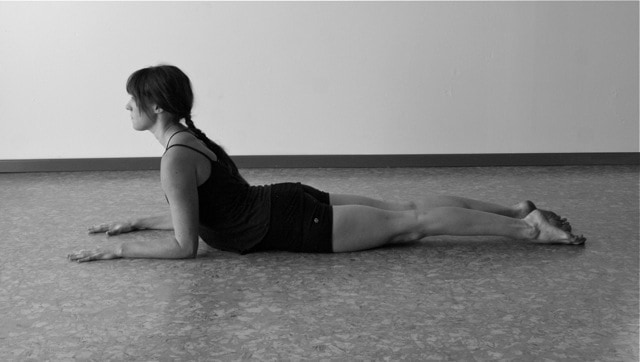
2. Lie Down and Put Yourself in Position
Next, lie down on that yoga mat on your stomach. As we alluded to earlier, fold your elbows at approximately 110 degrees, so that your forearms are flat on the mat. Then your upper arms rise on a slight angle towards your shoulders and the rest of your body. Check on the following before you begin:
- Rib cage should be up off the ground
- Head facing straight ahead
- Palms face down for grip
- Legs should width apart
- Knees can stay on the floor for now
- Top of feet neutral/flat on the floor
3. Pull
Now the action. Pull in with your forearms, with a slip hand grip on the mat. Act like you want to pull your arms further in until your elbows are at 90 degrees, but do not actually move your arms. If you want more emphasis on your core muscles, start with your forearms slightly further out. For a longer back stretch, start with your arms closer to the 90-degree mark.
You should definitely feel your back working, but not in pain, and your core doing work as well. This is not an exact science, so experiment with your own arm placement to determine what works best for you and your needs.
4. Release
After your predetermined amount of time, release your arms back into starting position. Do this gradually, no sudden movements. Once you are out of, you may rest your head on your hands for a few seconds and relax.
Sources: Howcast
How Long You Should Hold the Pose
Why the discrepancy in time? It depends what your goal is. If you are using this solely as a back flexibility and strength routine, 3 minutes or even 5 minutes should do the trick. In fact, the longer you can hold it the better. The key is consistency: do not use a different amount of time every day. Instead, do 3 minutes a day, then work your way up to 5 minutes a day, and so on.
This may seem like a long amount of time. Luckily, the sphinx pose, once you are in it, does not really require a lot of brain power. Just have the right muscle groups engaged and you are all set. Really the more you focus on it, the longer it feels. Try:
- Reading a book
- Listening to music
- Watching TV
Time will fly that way. Obviously, video games require too much movement and would not be a good idea. Similarly, having a conversation will distract your core muscles too, so keep talking to a minimum.
However, if you are simply working the sphinx pose into your larger yoga routine, you probably have better things to do then read a book for 20 minutes. In that case 30 seconds will do fine, allowing you a couple of breaths (in through your nose, out through your mouth) to stretch out the back and give your core a little work.
You need at least 30 seconds in the sphinx pose to sufficiently work these muscle groups. In general, it is a great idea to work the sphinx into your yoga section. Even in yoga, you do not have many options for working the back.
Source: Yoga Journal
How to Relax After the Sphinx
When you are all done, there is a chance of some initial tightness in your back. If this happens, there a couple easy poses you can roll into for about a minute just to massage your back: the child’s pose and the happy baby.
Child’s Pose
The child’s pose is a general pose used to relax throughout the yoga experience. If you are ever feeling uncomfortable and just need a minute or two to compose yourself, follow these steps:
- Get on your knees, with your feet straight back
- Bend over until your elbows touch the floor
- Keep your behind rested on the back of your ankles and facing back, not up
- Cross your hands
- Rest your forehead on your hand
- Lean your torso back slightly
- Take a few breaths and relax
Source: Vive Health
Happy Baby
If the child’s pose did not quite do the trick, the happy baby will give you a more focused back massage. This is so called because it gives the appearance of a baby rocking back and forth.
- Lay on your back
- Lift your legs up
- Use your pointer and middle fingers on each hand to hook your big toes
- Stretch your legs straight up, as high as you can, while keep your behind on or just an inch off the floor
- Now, bend your knees slightly.
- Pull your toes along with your feet down, until your knees are 90 degrees or as close to that as you can.
- Ideally, your elbows would be touching the floor.
- Slowly rock back and forth, carefully so that you do not fall over onto your side.
- If you do not feel the back massage, make slight adjustments to your arms or knees.
Source: Yogaesse with Waka Yogi
Recap
The sphinx pose is a unique technique that can work your back and be held for as long as you are able. There is a truly short list of moves that fit both of those qualifications. Give it a try either on its own or worked into the rest of your routine. When you are ready, you can use the sphinx as a baseline for much more complex moves.
And remember, yoga should stretch you and maybe make you a little uncomfortable, but it should never be outright painful. If it is, stop or reduce what you are doing until the pain subsides.
Sitasyoga.com is a participant in the Amazon Services LLC Associates Program, an affiliate advertising program designed to provide a means for sites to earn advertising fees by advertising and linking to Amazon.com. We also participate in other affiliate programs which compensate us for referring traffic.