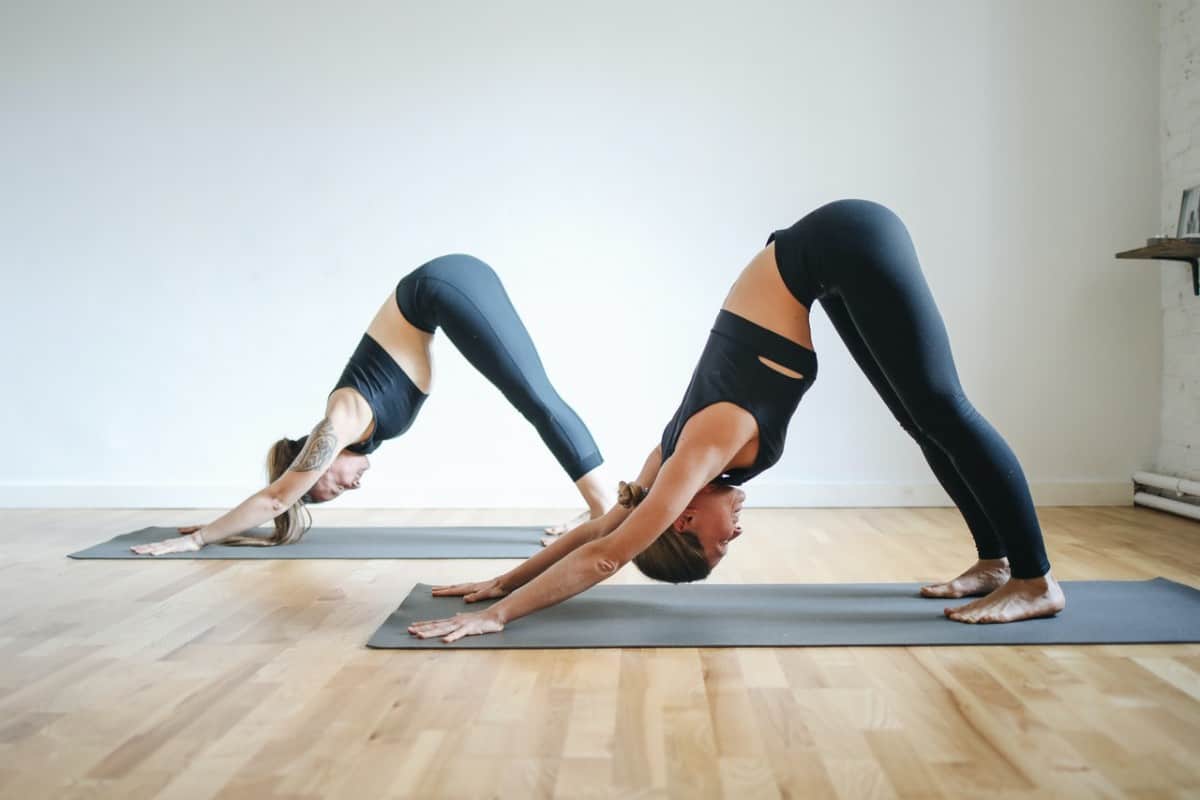
Maybe you’ve just taken up yoga, or you’ve been practicing now for a while, you might start asking yourself if any of these poses will come any more comfortable to you. Notably, one of the most widely recognized poses for yoga, the downward-facing dog can be a challenging pose for people just starting to practice yoga to seasoned professionals.
Downward dog gets easier as you practice more. Like any pose in yoga, repetition helps perfect the pose and strengthen your muscles. However, there are other ways to adapt and modify the downward dog to make the pose more comfortable and easier.
If you have just started yoga or you find yourself particularly discouraged by this pose, please note that there are variations to make it come more naturally to you. The most important rule of yoga to remember is to listen to your body and go at your individual pace.
How To Do Downward Dog Properly
You’re most likely familiar with this pose, even if you’re starting yoga. It is one of the most basic poses and typically well known, no matter what level of yoga you practice. The movement’s importance is that the small, subtle adjustments can create a much more in-depth concentrated stretch, so it is a foundational pose that can adjust to all types.
So, if you are new to this pose and are experiencing difficulty, know that there are ways to make it adapt to you. To first see how we can modify the stretch, let’s take a look at what the pose generally entails.
- Step 1: Begin on the floor with your hands and knees and set your knees directly below your hips. Expand your palms and spread your digits, keeping hands shoulder-width apart. Press firmly onto the palms of your hands and face your toes inward towards your body.
You may need to rotate your upper arms so that each elbow face the corners of your yoga mat—this aids in broadening the collarbone and supports drawing the shoulder blades down the back.
- Step 2: Take a deep breath then bring your knees up off the floor. Begin with the knees slightly bent with your heels lifted. When lifting towards the ceiling, bring focus to the core, also known as the transverse abs, and engage the lower belly. By doing this, you’re primarily drawing your lower body up towards the spine.
Take a moment to breathe and fully feel the stretch down your entire body to ensure that form is correct and comfortable enough to bring your hips upwards fully. When you’re ready, bring the hips up and tuck toes in.
Take a deep breath outward, push your thighs back, and feel the sensation of the stretch in your heels towards the floor. Be careful not to lock your knees but straighten them as much as you can.
- Step 3: Press your feet down (like you’re pedaling) to feel your legs straighten and return to a bend. Keeping the arms long let the neck feel elongated with the spine while maintaining a gentle arch. The objective here is to make the spine long, feeling it extend from the neck towards the tailbone.
- Step 4: Press your hands onto the floor, keep your head steady between arms, and don’t let your head hang; maintain control of the stretch. It is tempting to make the head hang loose, but maintaining control helps lengthen the spine and prevent your neck from becoming out of alignment. This control can also benefit the shoulders and keep them engaged.
- Step 5: Maintain this pose as long as you can, ideally for a minute before returning your knees to the floor. Finish within an exhale and rest into a child’s pose.
How To Modify Downward Dog
There’s a lot of different reasons you may need to modify the stretch, and that’s okay! Downward dog can be a challenging pose, so making some adjustments; you can still achieve the same results.
Consider using props to help support yourself. For instance, a blanket or a foam block can help support your heels. You can also roll part of your yoga mat up to bring extra lift and cushion to your hands.
If you find yourself struggling with sustaining your upper body weight and feel strain within your wrists, try decreasing your upper body weight by utilizing a chair or wall. You’re still optimizing the benefits of the stretch while practicing until you’re able to complete it in its entirety.
Why Should I Practice Downward-Facing Dog?
Although the pose itself activates the wrists, shoulders, spine, hamstrings, and legs by providing an in-depth stretch, they’re several other benefits to the Downward Doh. Some include:
- Stretching out the calves arches of feet and hands while strengthening the muscles to complete the pose itself.
- The pose alleviates symptoms of fatigue, body aches, back pain, and fatigue.
- Works to help combat mild depression, relieve stress, and improve memory and concentration.
- It improves eyesight and stimulates the hypothalamus.
- Nourishing hair follicles and can prevent baldness or graying.
Is Downward Dog Supposed To Be Hard?
The downward facing dog pose can be challenging, and sometimes even painful, to some individuals who have a larger upper body mass as it takes more time to strengthen the wrists and arms to support the body properly. This reason is why professionals advise beginners to make sure that you’re firmly pressing hands onto the ground to help avoid injury when performing the pose.
To better help angle your hands or for better wrist support, consider using a foam wedge or towel and place under the base of your hands, just above your wrists.
Poses That Help You Prepare For Downward Dog
Some poses can help prepare you and strengthen your muscles before trying the downward dog, such as plank poses coined from the Sanskrit name “phalakasana.” This pose consists of you lying on the floor with your torso parallel to the ground and having shoulders over wrists with arms perpendicular.
Spread your fingers and press firmly onto your hands to gradually pull yourself up to a firm stance that broadens your shoulder blade, brings your chest steady and forward, and brings heels back; this enables you to keep legs and core engaged and brings needed support to the pelvis.
Hold this pose with proper form, ideally for a minute or as long as you can. This pose will help strengthen these muscles needed to perform the downward dog.
Another pose in preparation of the downward dog is ‘uttanasana’ or the standing forward bend. This pose begins with hands-on-hips, and within an exhale, have your torso fall forward as if to hug your legs. Try to envision length as you can create from your head to your hips and release your fingertips towards the ground, and this time, press firmly through your feet while releasing the weight from the head and neck.
When inhaling, feel the torso expand and on exhaling feel the chest move inward. Stay in this pose for one minute. To exit, return hands to hips and slowly return yourself to a standing position.
How Did Downward Dog Get Its Name?
Although the name itself, ‘downward dog’ is a mouthful, it’s a bit easier than it’s full Sanskrit name: Adho Mukha Svanasana. When translating this, it breaks down as; Ahdo meaning ‘downward,’ Mukha meaning ‘face,’ and Svana meaning ‘dog.’
The inspiration for the name behind this pose is from observation of how dogs naturally curve and arch their bodies to stretch.
Learning to Love The Downward Dog Pose
Downward facing dog is a pose where we can soon start to feel the strength we gain from the pose’s adjustments and practice. While leaning in and challenging ourselves with repetitive exposure of flexibility to these muscles matched with deep and steady breathing, we can find a place of profound balance and resilience.
Sitasyoga.com is a participant in the Amazon Services LLC Associates Program, an affiliate advertising program designed to provide a means for sites to earn advertising fees by advertising and linking to Amazon.com. We also participate in other affiliate programs which compensate us for referring traffic.